Sunday, July 11, 2010

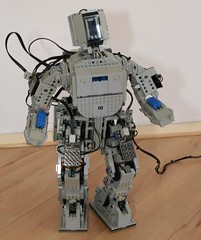
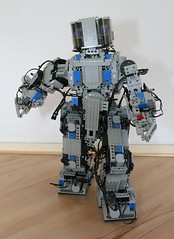
Building a biped: Putting it all together

After building three biped robots the goals for
the new model where:
* A good power to weight ratio: a small robot with a lot of degrees of freedom
* Fully automated calibration (I don't want to put it in a start position)
* Speed, both mechanical and software
* Strength, the robot must be able to walk

By using standard NXT motors I was able to reduce the number
of gears needed in the legs. The arms and body of the robot are
powered by power functions motors and micro motors.

The robot is fitted with 5 tilt sensors which are used to calibrate
the position of the motors in the legs. The motors in the arms use
friction gears and touch sensors to reset their position.

To control all functions of the robot three NXT bricks are used. One
brick controls six motors on the left side, one controls six motors on
the right side and one brick controls the COG shift and the head.
Bluetooth is used to communicate between the NXT bricks.

Once the hardware was finished I started programming the software.
The bricks which control the two sides of the robot each run a
state machine. The states are controlled from the master brick.
This makes it very easy to program. As long as the protocol
to communicate with the slaves does not change the slaves don´t
need to be updated, updating the master is all that is needed
to reprogram the robot.

The first routine I programmed was "standing". This might sound
strange but standing is actually a dynamic proces. The robot has
to respond to external forces like being pushed.

Just standing seems simple but it gave me some unexpected results.
When the input power of the motors was not set right the motors
started to resonate and the robot crashed.

After the standing routine was completed I extended the functionality
by programming a routine to lift the legs. The stabilization of the
legs is done with tilt sensors.

To fix the motor overshoot I implemented PID controllers. Programming a PID
controller is easy, tuning it is a different story, I am still working
on it.


Tuesday, July 6, 2010

Building a biped: Fixing the reset and control issues

After building the first two models and starting work on
the third model my building efforts where starting to look
like a true development program.

While experimenting with model 2 I decided that I should
reduce the complexity of the next bot to make it more
controllable.

I did not use any rotation sensors, I only used touch sensors.

The touch sensors gave me big problems, it turns out that
they work perfect when you press them at a straight angle
but when the angle is not close enough to 90 degrees they
don´t always work. To fix the problem I replaced the touch
sensors with reflective tiles and light sensors.

A single NXT brick, three sensor multipexers and three
motor multiplexers where used to control the robot.
The software was written in NXC.

Controlling this robot proved difficult. Because I replaced
the touch sensors with light sensors and used them in
combination with multiplexers they where slow to read.
Before reading a sensor value from the multiplexer you have
to give it some time to stabilize the power. This takes
about 50ms. That does not sound like a lot but the multiplexer
has 4 ports. To read all ports takes 200ms which means
you can only read your sensor values 5 times a second...
Way too slow!

Mechanically model 3 was a step down from the previous models
it was too weak to stand on one leg and the motors moved very
slow.

While experimenting with this robot I found out a simple trick
which makes it easier to shift the weight of the robot. If
the feet of the robot are angled in a way that the robot always
leans to the left or right side then the robot can select a
side to shift the weight to.

LegoAsimo model 3

Next time: Putting it all together

Qrio... unbelievable:

Thursday, July 1, 2010

Building a biped: Another year, another robot

With the experience of the first robot I knew that the
most important thing was to make the robot light and strong
enough to allow it to stand on one leg.

The first robot (model 1) had six degrees of freedom in each
leg. I decided that I could do with four.

The new model used power functions motors combined with
RCX rotation sensors. The robot was controlled with three
NXT bricks which was not enough to control all functions
but it did allow me to experiment with the legs.

The primary goal, building a robot which could stand on
one leg was achieved.

Unfortunately by solving one problem I ran into another
problem. When you control a motor you have to know the
exact angle of the axis. To do this you have to put
the robot in a starting position of which all angles
are known. From there you can move the axis relative to
the start position.


Next time: Fixing the reset and control issues...

Here´s something fantastic...
Stuff like this used to be science fiction: